
Moving a clunky pool table seems a daunting task, but with a little planning and the right help, it can be done smoothly and efficiently. This guide will walk you through everything you need to know. From disassembly and packing to transportation and reassembly of your slate pool table, everything is mentioned in detail. Read it out and make your pool table move successfully.
Moving a Pool Table: A Comprehensive Guide
Before You Begin
● Decide whether to hire professional movers or to do it by yourself
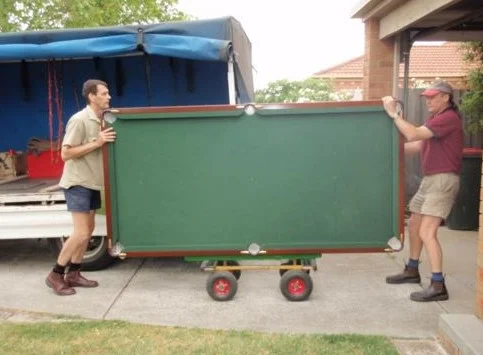
Disassembling and transporting a slate pool table is a labour-intensive job. If you don’t have the experience or manpower, hiring professional movers is a good option. They will have the expertise and equipment to handle the job safely and efficiently. Certainly, lifting a pool table is not a simple task as a usual table weighs around 4000 pounds and it can be increased as per the size. It is obvious that you won’t be able to lift up the table yourself, either you would need many friends or you can simply opt for a professional moving company with their skilled moving crew.
● Gather the necessary supplies
If you are planning to move the pool table yourself, you will need to gather some supplies. Here is a list:
Socket wrench set,
Screwdrivers (Phillips and flathead),
Allen wrenches (if applicable),
Pool table balls and triangles (packed separately for safekeeping),
Masking tape, Bubble wrap, Moving blankets, Furniture dolly, Pool table slate straps (optional, but recommended). In contrast, if you employ movers in Dallas for this detail oriented task you would definitely be at ease as you do not have to worry about these subtasks.
● Clear the area
To dismantle your pool table you will need plenty of space to do this task. Move any furniture or obstacles out of the way.
Dismantling the Pool Table
● Remove the balls and accessories
Pack the balls and triangles in a box with plenty of padding to prevent them from chipping or breaking.
● Detach the leather pockets
Pool table pockets with leather lining require special care during disassembly. Use a staple remover to carefully remove the staples that secure the leather to the rails. Avoid pulling on the leather itself, and try to pry the staples out from underneath the leather whenever possible.
● Disassemble the rails with leather pockets
The rails are typically held in place by bolts or brackets. Use your socket wrench or Allen wrenches to remove the fasteners.
Here’s a pro tip: Before completely removing the bolts, loosen them slightly but keep them attached. This will help to hold the pocket facings in place as you separate the rail sections. Once the fasteners are loose, carefully pull the rail sections apart, keeping the leather pocket facing attached to one of the rail sections. Lay the rails flat on a moving blanket.
● Remove the slate:
The slate is the heaviest part of the pool table. It’s important to have at least two or three helpers to assist you with this step. Safety first: If you’re not confident in lifting the slate manually, consider renting a slate lifter to make the process safer. Carefully lay the slate flat on the moving blankets.
● Detach the legs
The legs are usually bolted to the underside of the table frame. Use your socket wrench to remove the bolts and detach the legs.
Packing the Pool Table
● Protect the slate:
The slate is the most delicate part of the pool table, so it’s important to pack it carefully. Wrap the slate in multiple layers of moving blankets to protect it from scratches and cracks. Secure the blankets with masking tape.
For extra security, consider using pool table slate straps. These straps are designed to evenly distribute the weight of the slate and prevent it from shifting during transport.
● Protect the rails and legs:
Wrap the rails and legs in bubble wrap and moving blankets to protect them from scratches and dings. Secure the blankets with masking tape. Pay special attention to the leather pockets on the rails – ensure they are wrapped securely to prevent tears or scratches.
● Keep track of hardware
As you disassemble the pool table, place all the hardware (bolts, screws, staples from the leather pockets, etc.) in a labelled bag or container. This will make it much easier to reassemble the table later.
Transporting the Pool Table
Although moving a pool table can be difficult, it can be accomplished with the correct preparation and tools.
- Measure the pool table’s dimensions as well as the doorways and stairs it must pass through first.
- This will assist in determining whether any disassembly is necessary.
- In addition, assemble a group of sturdy people to assist with carrying and lifting the table.
- It is imperative to employ appropriate lifting techniques and wear protective gear to prevent injuries.
In this way, you can ensure the safe transportation of pool tables.
Reassembling the Pool Table strong
● Reassemble the table frame:
Reattach the legs to the underside of the table frame using the bolts you removed earlier. Tighten the bolts securely.
● Reattach the slate:
Carefully lower the slate onto the table frame. Make sure it is positioned correctly.
● Reassemble the rails with leather pockets:
Carefully align the rail sections with the leather pockets still attached. Fasten the bolts or brackets you loosened earlier to secure the rails back onto the table frame. Tighten the fasteners securely.
● Reattach the leather pockets (if separate from the rails):
Once the rails are secured, use a staple gun to reattach the leather pockets to the underside of the rails, ensuring a taut and even fit.
● Level the table:
Once the pool table is reassembled, you’ll need to level it using a pool table level. Place the level on the slate in several different spots and adjust the legs as needed until the slate is perfectly level.
Tips for Success
- Employ professional movers for this arduous task. Their experience and skilled staff can get you through this.
- Before you disassemble the pool table, take pictures of how it’s put together.
- This will be a helpful reference when you reassemble the table at your new location.
- As you disassemble the pool table, label all of the pieces and hardware, including the leather pockets.
- This will help you keep track of everything and ensure a smooth reassembly process.
- Enjoy your game once you’ve successfully moved and reassembled your pool table.
- Take some time to relax and enjoy a game with friends or family.
Conclusion
To sum up, moving a pool table requires careful planning, some muscle power, and the right techniques. By following the steps outlined in this guide and using the recommended tools and materials, you can move your pool table safely and efficiently.
Just remember, if you’re ever unsure about any part of the process, don’t hesitate to consult with professional movers or an experienced moving company with extensive knowledge. With a little effort, you will have your pool table up and running in no time at your new location.